Washi Tape Candle Card (+Sisterhood of the World Bloggers Award!)

Washi Tape Candle Card

Hello Doodlers! I hope you’re having a great summer. I’m so happy to be back, and very excited for this post! First of all, I’ve seen cards similar to this one all over Pinterest (follow DTD here), and I’m thrilled to share by own design with you. Second, after the tutorial, I’ll accept and nominate seven of my favorite bloggers for the Sisterhood of the World Bloggers Award.

Without further ado, let’s get started with the card!

collage

Materials:

File folder

4 Colors of washi tape

5″ by 7″ plain white paper

Scissors

Ruler

Black pen

Yellow colored pencil

Glue stick

1. Evenly space four strips of washi tape, one of each color, on the plain paper.

2. Using the black pen and colored pencil, draw a wick and flame at the top of each strip of tape.

3. Cut a 5.5″ by 7.5″ rectangle out of the file folder (while it is folded), as the picture shows. Unfolded, the piece you just cut out should be 11″ by 7″. Make sure the area you cut out does not contain words on the inside or outside.

4. Outline the front of your card in the washi tape.

5. Using the glue stick, center the decorated white paper onto the front of the card, on top of the washi outline.

That’s all! Despite its simplicity, the card is super cute, and perfect for last minute gifts.

Now, for the award: I’d like to thank Luna from My Irrelevant Thoughts for nominating Duct Tape Doodles for the Sisterhood of the World Bloggers Award. I love reading Luna’s detailed book reviews and humorous (and definitely not irrelevant) thoughts, and definitely recommend checking out her blog!

Rules:

1. Thank the blogger who nominated you, and link back to their blog.

2. Place the award logo on your blog (It’ll be in the sidebar.)

3. Answer the 7 questions.

4. Nominate 7 others.

Questions:

  1. In one word, how would you like your readers to describe your blog?
    1. Creative!
  2. Which blog post on your blog is your favourite and why?
    1. Probably the Desk Organizer. I love that it uses recycled materials, and I’m also pretty fond of the tape pattern that I used. The organizer, though not my easiest craft, was one of the most fun to make, and is still sitting happily on my desk!
  3. What, or who, inspires most of your blog posts?
    1. Some of my crafts are inspired by Pinterest; others just spew out of my head (including embarrassing middle school posts like this Dry-Erase Board that doesn’t actually work). I also love trying out suggestions from readers, so make sure to visit the Suggestions page with your DIY ideas.
  4. What do you aspire to accomplish this year?
    1. This coming school year, I’d like to keep my grades up and stay in shape. It will definitely be a busy year, and I’m hoping to get enough sleep!
  5. What is your favorite book?
    1. The Land of Green Ginger by Noel Langely. The hilarious story continues the story of Aladdin, and though it’s technically a children’s book, it still always makes me laugh.
  6. What’s the most courageous thing you’ve ever done?
    1. I really, really, really don’t know. I should add “be courageous” to my goals for question 4.
  7. Who is your female role model? 
    1. I can’t choose! So many women are so inspirational in so many ways 🙂

Nominations:

1. Trend-mixblog

2. Softwear Hacks

3. Caution District

4. Shiori

5. Inspector Gorgeous

6. Make Something Mondays

7. Crafter Crums

Congrats to the nominees, and again, thank you so much to Luna from My Irrelevant Thoughts!

Duct Tape Pen Pouch

Duct Tape Pen Pouch

Hola! Today’s craft is a duct tape pen pouch, made out of a regular snack bag. You can also use this pouch to store other supplies, like scissors or washi tape. I’m not including a collage, because I think the craft is mostly self-explanatory; however, if you are confused about any steps, fell free to ask any questions in the comments section.

Materials:

Duct tape

Plastic snack bag

Scissors

1. Cover the bag in duct tape below the zipper.

2. Trim the edges. Don’t cut too close to the bag; it is better to have duct tape hanging evenly off the side than to cut the bag open.

Make sure to check out Duct Tape Doodles on PinterestBloglovin’ and Google Plus!

Have a great day 🙂

Washi Tape Corner Bookmark

washi tape corner bookmark

Happy Earth Day! Today, after much “Pinspiration,” I created my first corner bookmark! The advantage of a corner bookmark is that it does not stick out of books, making it less easily bent and torn. Creating the bookmark is simple and quick. Of course, it’s green and brown, in honor of our fantastic Earth!

Corner bookmark instructions

Materials:

6″ by 6″ piece of cardstock

Pencil

Scissors

Ruler

Glue

Paintbrush

Washi tape

1. In pencil, lightly divide the cardstock into four equal squares (I darkened the lines in the picture to make it easier to see.)

2. Divide two opposite squares diagonally, as the picture shows.

3. Cut off two outer triangles and one square. Again, use the picture for reference.

4. Fold both triangles on top of the square. Using the paintbrush, spread a thin layer of glue over only the top of the bottom triangle. Then, press the top triangle over the bottom triangle. Don’t glue the square!

5. Cover in washi tape.

That’s all! If one bookmark just isn’t enough, try making a Duct Tape Fall Bookmark or the “It’s Rough” Duct Tape Bookmark. If you prefer reading on your kindle, make sure your e-reader has a stylish case!

Also, you should definitely check out this post on Caution District for tips on making Earth a cleaner planet.

Don’t forget to follow Duct Tape Doodles on PinterestBloglovin’ and Google Plus!

Have a great day 🙂

Duct Tape Felt-Lined Kindle Case

Felt Kindle Case

Hey Doodlers!

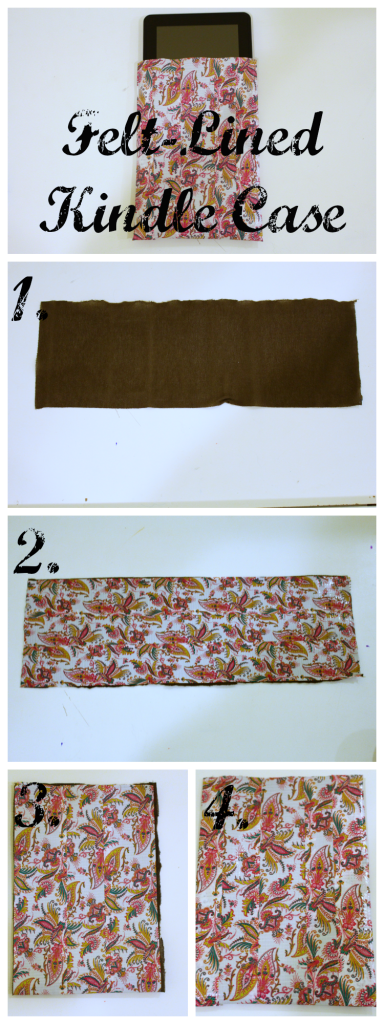
I’ve made a couple kindle cases already, and both posts are consistently popular on Duct Tape Doodles. Today, I decided to create an updated case, which contains a felt lining. The lining offers more protection than duct tape on its own, and also lets the kindle slide in and out more smoothly. Still, only rely on this case for minor falls and scratches. Though I made this case for my kindle fire (first generation), the measurements can be adjusted to fit e-readers of various sizes. Here’s the tutorial (Sorry about the gloomy editing; it’s raining outside.)

collage

Materials:

Felt

Duct tape

Ruler

Scissors

Kindle

1. Cut the felt to the correct size. Mine was 5.5″ by 16,” and I found these dimensions by adding an half inch to the height of my kindle and multiplying by two, and also adding an inch to the width. Depending on the thickness of your kindle, you may need to add more or less.

2. Cover the non-fuzzy side of your felt in duct tape. Trim the ends.

3. Fold the felt in half vertically (also known as the “hamburger” way).

4. Cut two more strips of tape, and fold them over the left and right edges of the case. You’ll need to fold the sides of the case over along with the strips, to prevent any stickiness inside the pouch.

The process is tricky to explain, but I promise the kindle holder is easy to create! Make sure to comment any questions, and I’ll definitely help you out :).

Don’t forget to follow Duct Tape Doodles on PinterestBloglovin’ and Google Plus! See you next time!

P.S. Click here or here to see previous kindle cases.

Duct Tape Desk Organizer

 Dut Tape Desk Organizer

Happy spring! I’m so excited to share today’s project, mostly because I’m OBSESSED with my new duct tape! I found the pattern on sale at Office Max last weekend. The design is called “Paisley Princess,” and comes in two colors: pink and purple. The tape is actually Scotch brand, not Duck brand, but I haven’t noticed any major differences between the two companies. I have to say, Paisley Princess is probably the prettiest duct tape I’ve owned. EVER. (Can you tell how excited I am?)

Anyway, I like this desk organizer because it’s affordable to create; I used old toilet paper and paper towel rolls. Here’s how I made it:

Duct Tape Desk Organizer Instructions

Duct Tape Desk Organizer

Materials:

4 toilet paper tubes, cut to different heights

Duct Tape

Cardstock

Mod Podge (please don’t call it “Modge Podge,” or I’ll cry)

Scissors

Paintbrush

1. Cover all of the toilet paper tubes in duct tape. Only cover the sides; don’t tape over the top and bottom.

2. Arrange the toilet paper tubes in a square, and wrap a piece of tape around them to hold them in place.

3. Use the Mod Podge and paintbrush to attach the bottom of your desk organizer to the cardstock, and let dry. Use a lot of Mod Podge! As you can see in the picture, I really piled it up around the edges. My organizer needed to dry overnight.

4. Use scissors to trim around the base of your organizer.

That’s it! The container is super sturdy and convenient, and a great place to keep your Duct Tape Rose Pen or Washi Tape Pencils. Just saying.

I hope everyone has a great week! Make sure to follow Duct Tape Doodles on Pinterest, Bloglovin’ and Google Plus! See you next time 🙂

Easy Washi Tape Clothespins

COVER

Happy February! To celebrate the new month, here are some easy DIY Valentine’s Day clothespins. I like that this craft is very quick but still cute. 🙂

You need:

Red and pink washi tape

Clothespins

X-acto knife

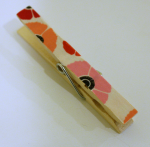
1. Lay a clothespin on a slightly longer piece of washi tape.

step1

2. Trim excess tape.

step2

3. Repeat on the other side of the clothespin.

And that’s it! You can create about 10 clothespins in half an hour. Once you get the hang of making them, it’s hard to stop!

Finally, I’d like to give a shoutout to one of my favorite blogs, Caution District. Asya is a teenage blogger who posts consistently (unlike me) with advice, musings, reviews, and my personal favorite, workouts. I definitely recommend checking out her blog!

Screen Shot 2015-02-03 at 12.43.57 PM

Have a great rest of the week! ❤

Duct Tape Winter Portable Speakers

COVER

Wow. It has DEFINITELY been awhile. And all I can say for myself is: 1. School and sports are INSANE. 2. Happy Halloween, Thanksgiving, holidays, and New Year! If you live in New England like me, you probably got hit by a MASSIVE snow storm today, which forced activities to be cancelled, and left time to catch up on blogging! Anyway, to keep with the winter theme, I made this blue and white portable speaker, inspired by this post, which I discovered on Pinterest (make sure to follow Duct Tape Doodles)! I know this isn’t exactly high-tech, but it’s cheap, convenient, and doesn’t require electricity, so it makes a great temporary solution. The ducks agree. Here’s how I made the speakers:

COLLAGE

Duct Tape Portable Speakers

Materials:

Blue duct tape

1 Toilet paper tube

Cell phone or MP3 player

Paint sharpie

X-acto knife

4 Matching pushpins

Pencil

1. Using the pencil, trace the bottom of your device onto the toilet paper tube. If you usually use a case, leave it on for this step.

2. Use the X-acto knife to cut out the shape you just traced. MAKE SURE YOUR DEVICE FITS SNUGLY IN THE HOLE.

3. Cover the ENTIRE toilet paper roll in duct tape. You can tape right over the hole.

4. Cut an “X” shape across the hole with the X-acto knife. I drew in the “X” in the collage for you to see, but you can just go ahead and cut it.

5. Fold the triangles created by the “X” into the tube so they cannot be seen.

6. Decorate the speakers with the paint sharpie! You may need to use 2 coats.

7. Insert the pushpins so that the speakers can stand up. This took me a couple of tries. WARNING: THESE SPEAKERS SHOULD NOT BE USED BY SMALL CHILDREN AS THEY COULD BE INJURED BY THE PUSH PINS. ALWAYS BE CAREFUL WHEN USING THESE SPEAKERS.

8. Insert your device and play some music!

I tested these speakers and found that they actually do nicely enhance the sound. I was pleasantly surprised :). After making these speakers, try making a washi tape charger too! Thank you to everyone who stuck with me through my frustrating absence. I missed you! Hopefully I’ll be back soon. Have a great rest of the week! ❤